Take action now before the snow piles up!
In the cold winter months of NJ, your home’s roof can take a beating and it is very possible for an Ice Dam to form, but they can be reduced and eliminated with proper insulation and venting. In this article, we’ll teach you what an ice dam is, how it forms and how to get ahead of Ice Dams before they become a problem.
About ice dams
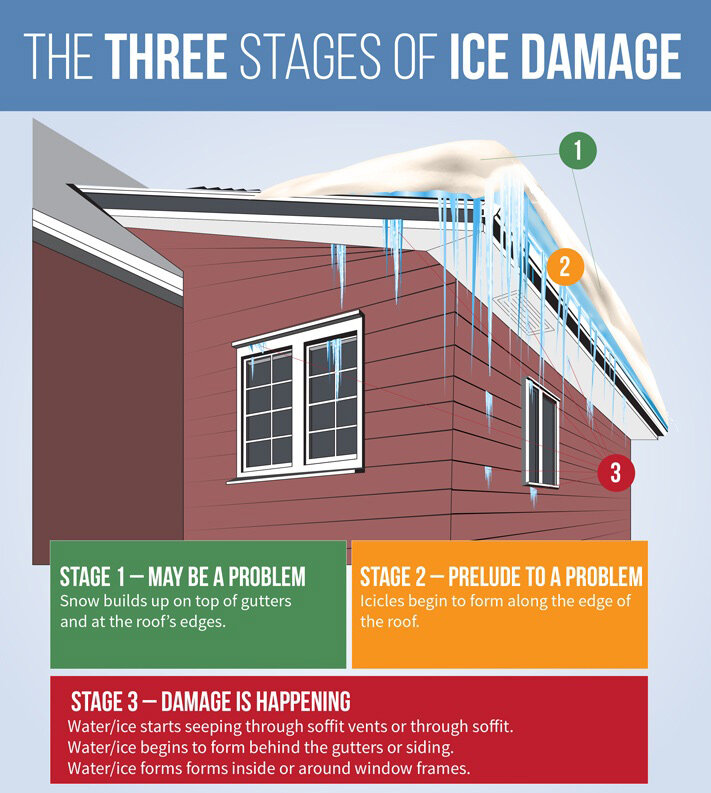
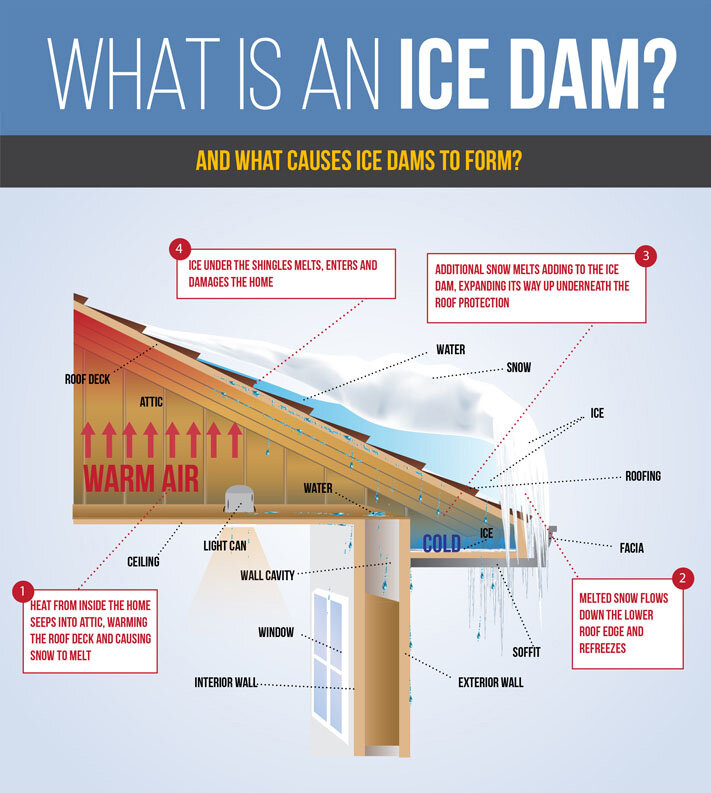
Yes, last year’s icicles hanging from your gutters and eaves maybe just a faint memory now. But now that winter is here it has brought one of your roofs greatest dangers – ice dams. Ice dams are continuous chunks of ice that form along sections of your roof. While frozen, they’re not much trouble but during the warmer parts of a winter day, water melting off the roof pools behind the ice then seeps up under your roof’s shingles. This moving water can seep as far as 10 ft. back up under the shingles. Eventually, it drips through the roof into the soffits (the outside overhangs), walls, and worst of all, onto your ceilings. Often the first sign of ice dams are rust spots on drywall fasteners, peeling paint, sagging drywall and stains around windows and doors.

Understanding how ice dams form
-
The snow that stays on the roof for more than a few days, combines with freezing temperatures
-
Warm air from your living space that leaks into the attic, causing snow to melt high on the roof
-
Missing membrane protection beneath roof shingles along roof eaves

Prevention is key in keeping ice off your roof and water out of your home
1. Close up attic bypasses
In most homes about one-third of the heat loss is through the ceiling into the attic. And most of that loss comes from air leaks caused by unblocked walls, gaps in drywall, and cracks around light fixtures, plumbing pipes, chimneys, access hatches, and other ceiling penetrations. Air leaks can be tough to stop. You have to climb into your attic, pull or rake back insulation, and plug the leaks using foam, caulk and other methods. Low roof angles make some air leaks difficult to reach. This work is definitely a cool weather project; your attic will be unbearably hot otherwise. Bonus: By stopping air leakage to mitigate ice dams, you’ll save energy and reduce both your heating and your air conditioning bills.
2. Measure your attic insulation level
While you’re in the attic, check the depth of your attic insulation. Building codes require about 12 to 14 in. of fiberglass or cellulose. Add more if you have less than 8 in. and have had ice dam problems in the past. Blown-in cellulose and fiberglass are usually better than hand-placed batts, because they fill more tightly around rafters, joists and other obstructions, leaving fewer gaps. It’s usually worth hiring a professional for this job; you probably won’t save much by doing it yourself.
3. Add roof and soffit vents
Attic ventilation draws cold outdoor air in and flushes warmer attic air out, cooling both the attic and the roof in the process. The minimum ventilation area (size of the openings) should be about 1 sq. ft. of vent per 300 sq. ft. of ceiling area (attic floor area), when half the vent area is low on the roof and half is high. Actually figuring all this out is a bit complex; you’d have to examine your existing vents to find the area of each, which is written on them. As a rule of thumb, put an 8 x 16-in. vent in the underside of the overhang (soffit) in every other rafter space (If you’re planning to rebuild the soffit, install a continuous 2-1/2-in.-wide “strip” vent, because it will look better.) And install a continuous ridge vent along the peak (Fig. B). If the ridge on your roof is much shorter than the roof edge—on pyramid-shaped roofs, for example—add the common square-shaped roof vents near the peak. Add enough so their ventilating area is about equal to the area of soffit vents. This might deliver a whole lot more ventilation than the minimum requirement, but don’t worry. You’re unlikely to have too much ventilation.
What to do if you already have an ice dam
Ice dams aren’t necessarily a problem alone, it’s the leaks that do the real damage. If you don’t see any signs of ice dam leakage, either in the soffits on the outside or in the attic or ceilings, you may not have to do anything. Once the weather warms up you can apply the prevention strategies we listed earlier.
Getting professional help
If you have leakage from an ice dam and can’t rake the snow off the roof, the best way to get rid of the ice dam is to hire a roofing company to steam it off. A steamer is like a pressure washer, except that the water is hot. It melts the ice away without damaging the roofing. Please don’t do yourself the disservice of Chipping the ice off with a hatchet or an ice pick as you will likely do more damage to your shingles and roof than good.
The team at Above & Beyond is happy to come to have a look at your roof and advise the best approach to protect your home from the weather.
Contact us today for a free no-pressure estimate and assessment.


 (908) 588-9575